Networking
Networking
Manage IP addresses, private networks and bandwidth for your virtual machines.
On this page5 sections
Public IP addresses#
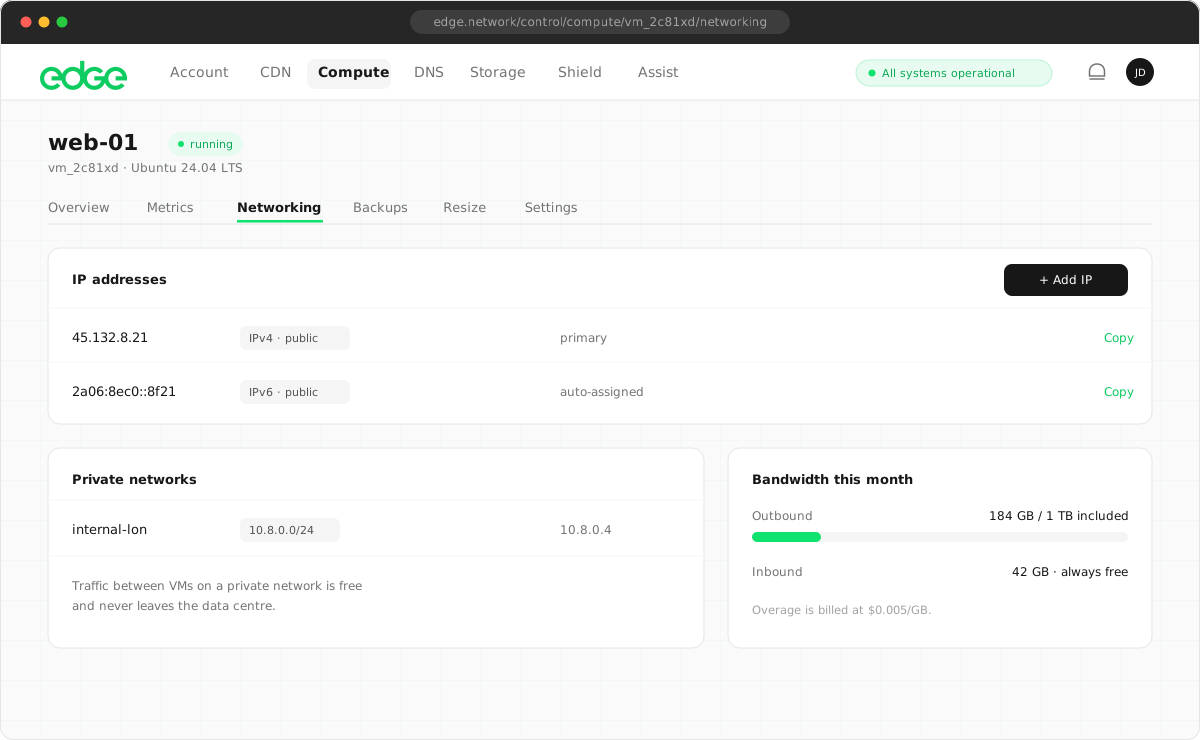
Every VM is assigned a public IPv4 address on creation. This is your VM’s primary public address for incoming and outgoing traffic.
Finding your IP address#
- Navigate to your VM’s Networking tab.
- Your public IPv4 address is displayed at the top.
- Click the copy icon to copy it to the clipboard.
Additional IP addresses#
You can add additional public IPv4 addresses to your VM for hosting multiple services, SSL certificates or failover configurations.
Adding an IP address#
- Go to your VM’s Networking tab.
- Click Add IP.
- Confirm the additional cost ($2/month per IP).
- The new IP is allocated and displayed in the list.
Configuring additional IPs#
Additional IPs are assigned to your VM but need to be configured in the operating system. Here’s how to add an IP on Ubuntu/Debian:
# Add a secondary IP to eth0
sudo ip addr add YOUR_NEW_IP/32 dev eth0

# Make it persistent (Ubuntu 18.04+)
# Edit /etc/netplan/50-cloud-init.yaml and add:
#   addresses:
#     - YOUR_PRIMARY_IP/24
#     - YOUR_NEW_IP/32
Removing an IP address#
- Go to your VM’s Networking tab.
- Find the IP you want to remove.
- Click the trash icon next to the IP.
- Confirm the deletion.
Private networks#
Private networks allow your VMs to communicate with each other securely, without traffic going over the public internet.
Benefits#
- Secure VM-to-VM communication
- No exposure to the public internet
- Lower latency than public networking
- Free bandwidth between VMs
Limitations#
- Same region only
- One private IP per network per VM
- Maximum of 10 networks per account
Creating a private network#
- Go to any VM’s Networking tab.
- Scroll to Your Private Networks.
- Click Create Network.
- Enter a name for the network.
- Click Create Network.
The network is automatically assigned an IP range (e.g. 10.x.0.0/24) and gateway.
Attaching VMs to a network#
- Go to the VM’s Networking tab.
- Click Attach Network.
- Select the network from the dropdown.
- The VM is assigned a private IP on that network.
# After attaching, the network interface appears automatically
# Check with:
ip addr show

# You should see an interface like ens4 with your private IP
# e.g., inet 10.185.0.2/24
Detaching and deleting#
To detach a VM from a network, click the trash icon next to the attached network. To delete a network entirely, you must first detach all VMs from it.
Bandwidth#
Monitor your VM’s bandwidth usage from the Networking tab. Edge Network includes generous bandwidth with zero egress fees.
Viewing bandwidth usage#
The Networking tab shows your current month’s bandwidth usage:
- Inbound: data received by your VM
- Outbound: data sent from your VM
- Total: combined bandwidth usage
IPv6#
IPv6 support varies by region. Where available, your VM is assigned a public IPv6 address in addition to its IPv4 address.
IPv6 addresses are displayed in the Networking tab alongside your IPv4 addresses. Both protocols are supported simultaneously.
Something unclear or out of date? Tell us